Introduction to APIs using Comnoco as an Alternative to Postman
This guide introduces beginners to working with APIs by using Comnoco to set up, modify, and secure API calls.
APIs, or Application Programming Interfaces, enable different software applications to communicate with each other, allowing you to retrieve data or trigger actions in other systems.
In this tutorial, we’ll use the Owen Wilson Wow API as an example to demonstrate how to work with APIs in Comnoco (specifically the https://owen-wilson-wow-api.onrender.com/wows/random endpoint), enabling you to test, process, and build functionality without needing to write code.
Using Comnoco instead of a tool like Postman allows you to move beyond testing API calls. In Comnoco, you can automate calls, add logic to modify requests dynamically, handle and loop through responses, and much more - Comnoco is a Visual Programming Language for Backends.
This guide will help you understand each of these aspects by walking you through practical exercises.
Section 1: Setting up your first API call in Comnoco
1.1: Creating the Workspace
-
Navigate to the Dashboard: Make sure you are logged into your Comnoco account and locate the
Create new workspacebutton on the dashboard. -
Create Your Workspace: Enter a meaningful title for your project, for this example we have used
Working with APIs. Optionally, you can add a description to your workspace.
1.2: Understanding and Creating a Function Collection
In this step you will create a Function Collection sometimes referred to as a Logix File due to it’s .logix extension, which is a method of logically grouping together individual functions.
This will be your first introduction to the Comnoco tree.
The tree is your canvas on which you can create in an organised manner. Comnoco guides you by providing a visual representation of your logic flow and guiding you to the things that you can do at any point.
It does this by providing you with a list of compatible blocks (prebuilt nodes of functionality) that you can use at any point.
These points are known as slots and in Comnoco there are two types of slots; a single slot and a list slot (multiple slot).
The top-level blocks in a function collection each represent an individual function. A function collection serves as an organised grouping of these blocks, giving you the flexibility to structure them in a way that suits your needs.
A function in programming is a reusable set of instructions that can be called from different parts of a program, where you pass it the information it needs, and it returns the result it creates.
For example, you could:
- Group by category: Create one comprehensive collection for related functions, such as Mathematical Operations (e.g., functions for addition, multiplication, and division).
- Group by purpose: Create smaller, focused collections where each one contains at least one function, such as Add Function for addition or Tax Calculation for computing sales tax.
- Group by system or integration: Use collections to manage all interactions with a specific service, like Stripe Payments for payment-related workflows or Xero Accounting for financial operations.
Function collections can act as top-level starting points that streamline organisation of your workspace and help you quickly navigate to the functions you need. This flexibility makes it easy to align your collections with your workflow and logical structure.
1. Create a Function Collection:
Navigate to the Create New button in your workspace and select Function Collection. Name your function collection. For this example we have used APICall.
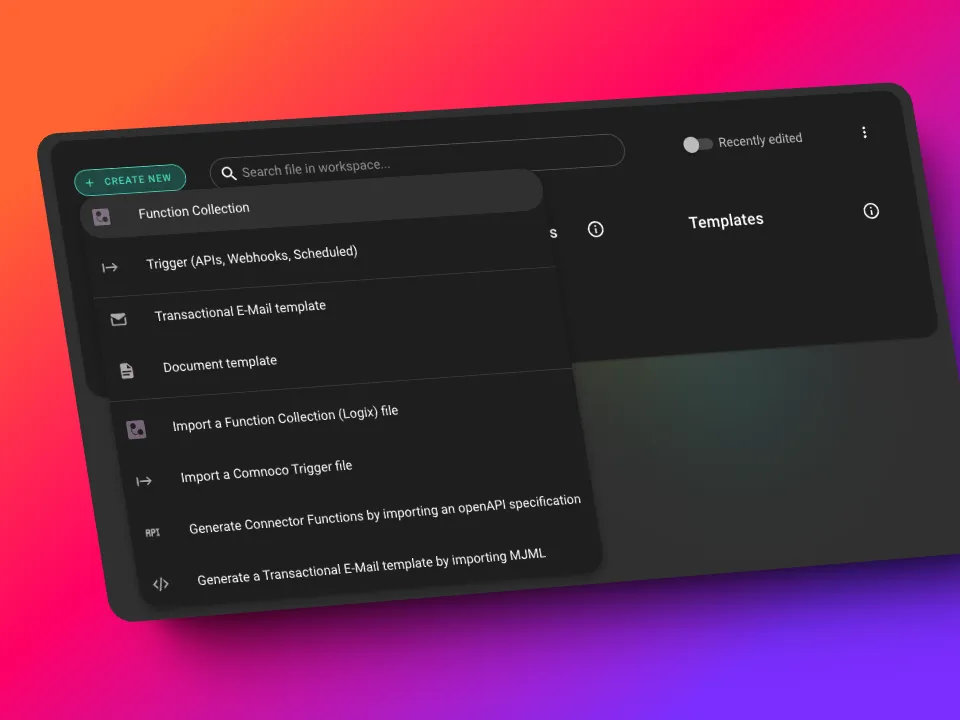
1.3: Creating your First Function
As mentioned previously, we can view functions as building blocks. Let’s create one!
1. Choosing your function:
You can choose from four different types of functions:
-
🔄
API Function: To enable communication between external systems and Comnoco by allowing external systems to call on your function as an API with specified input parameters. -
🧱
Component Function: A reusable logic block that can be used repeatedly across function collections - a way for you to build your own bespoke blocks. -
🕰️
Schedule Function: Automates tasks, running at specified intervals. -
🪝
Webhook Function: Similar to an API function however input parameters cannot be defined; it receives all data as-is defined by the calling system.
For this guide, we will start by building a reusable Component Function.
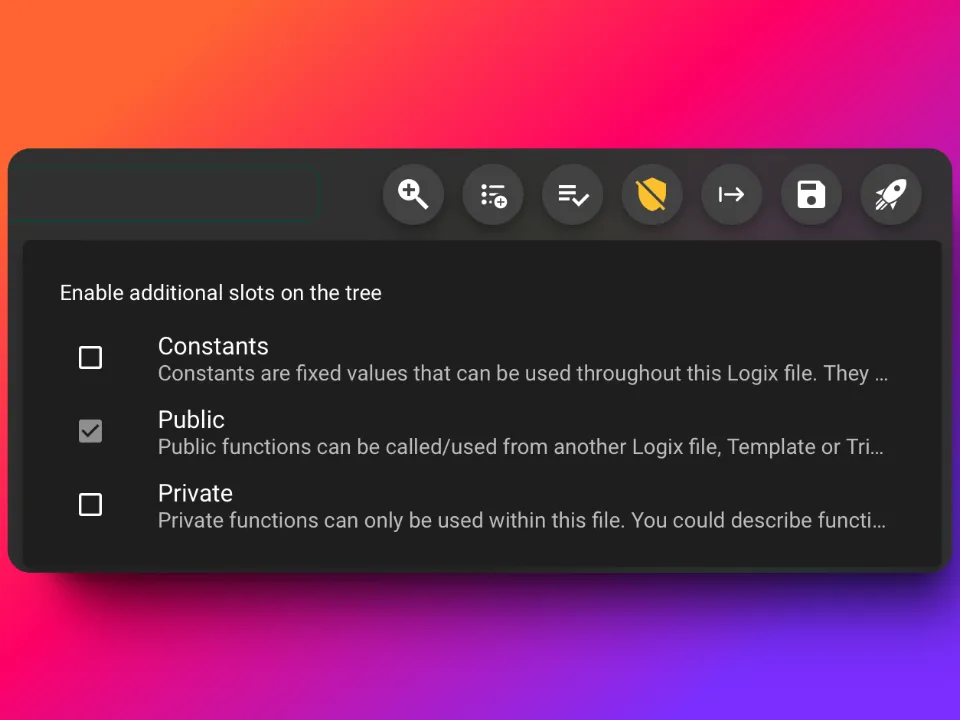
2. Creating the Function:
- Navigate to the
Click here to startslot and select theComponent Functionoption.
It’s important to relate the function name to its action (so that you can easily understand at a glance what it does). We have chosen ‘GetRandomWowQuote’.
Now that you have created the function, lets explore it’s foundation. At this stage you should see 4 list slots:
| Slot | Description | Access |
|---|---|---|
| Input Parameters | Allows you to set values as inputs for this function | Read-Only |
| Variables | For variables and constants you need in the function | Read and Write |
| Logic Flow | This is where you build logic and can call other functions | - |
| Output Parameters | Allows you to set values as outputs (results) from this function | Write-Only |
For now, we will skip input/output parameters and focus on building the logic flow, as the aim of this section of the guide is to illustrate how to call an external API.
1.4: Building the Logic Flow
Think of a logic flow as the heart of your function - a flow of logic that you build as if you were working with LEGO(s) using blocks or even other component functions you have created. Steps are performed in sequential order top down and outwards through branches as they go.
You can apply business logic based on any data or condition to any part of this logic flow.
1. Create a Set Data Structure:
Begin by putting a Set Data Structure block within your Logic Flow list slot. This is necessary to handle the returned API response correctly.
Think of it as an intermediary that receives and then passes the data returned from the API to a store (being a variable).
Be sure to give the block a clear and descriptive name to ensure you can easily understand its purpose if you revisit it later.
The Set Data Structure will display 2 slots:
| Slot Name | Purpose |
|---|---|
| From | This is where you will place the API call. |
| To | This is where you will reference the response (result) variable (see below) |
2. Add the API Call
In the From slot insert an API call block by clicking on the + add point. You will need to choose it from a list of blocks that will work at this point (things you could do).
All blocks have a properties section where you can set the values for the block. You can see this when you click on a block, it will expand to show the properties on the right hand side.
For the API Call block you just added:
- set the
MethodtoGET - input the URL of the API you are using. This is to match the
GETmethod of the OWEN WILSON WOW API.
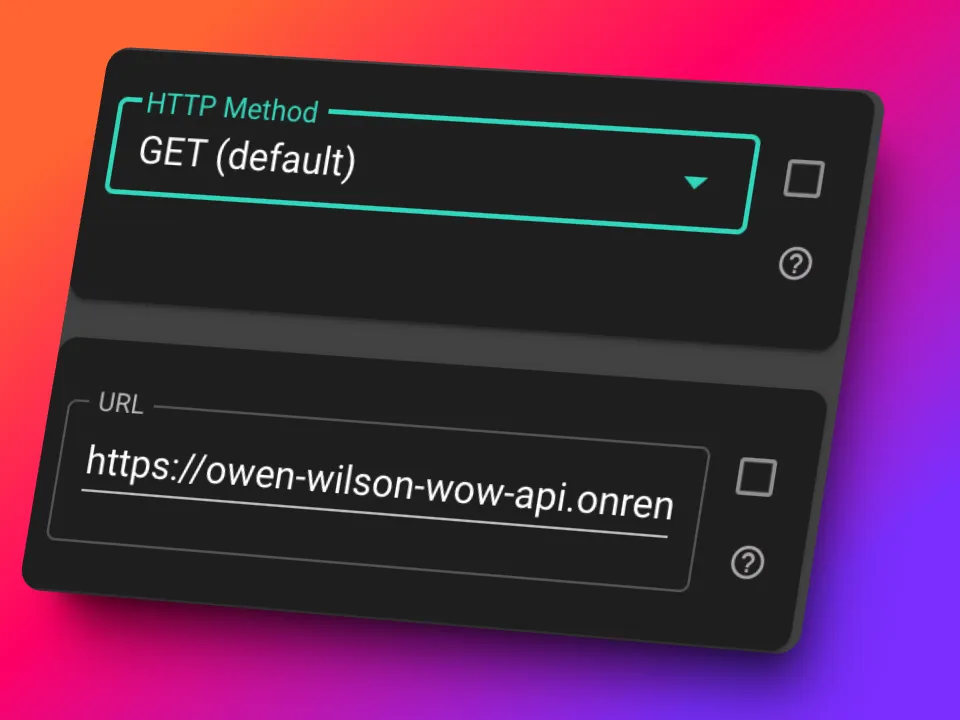
Functions can be run as a whole to test their functionality or you can test individual parts or blocks within your logic flow.
To test the functionality in isolation, you can execute the block we just created. This allows us to confirm that the API call successfully sends a request to the external system. However, since we haven’t configured the response to be stored, the output will not be visible at this stage!
3. Create and Link the Response Variable:
We need somewhere to store the response from the API call.
-
Navigate to the
Variablesslot in your function. -
Click on the add point. This will give you a selection of what you can add at this point - in this case different types of data.
-
As we want to store a structured response, select the
Data Structureblock type to store the APIs response. -
In the properties for the block you just added name it
Response. -
Return to the
Toslot within theSet Data Structureblock, click add and locate the newly createdResponsevariable listed underInternal Variables.
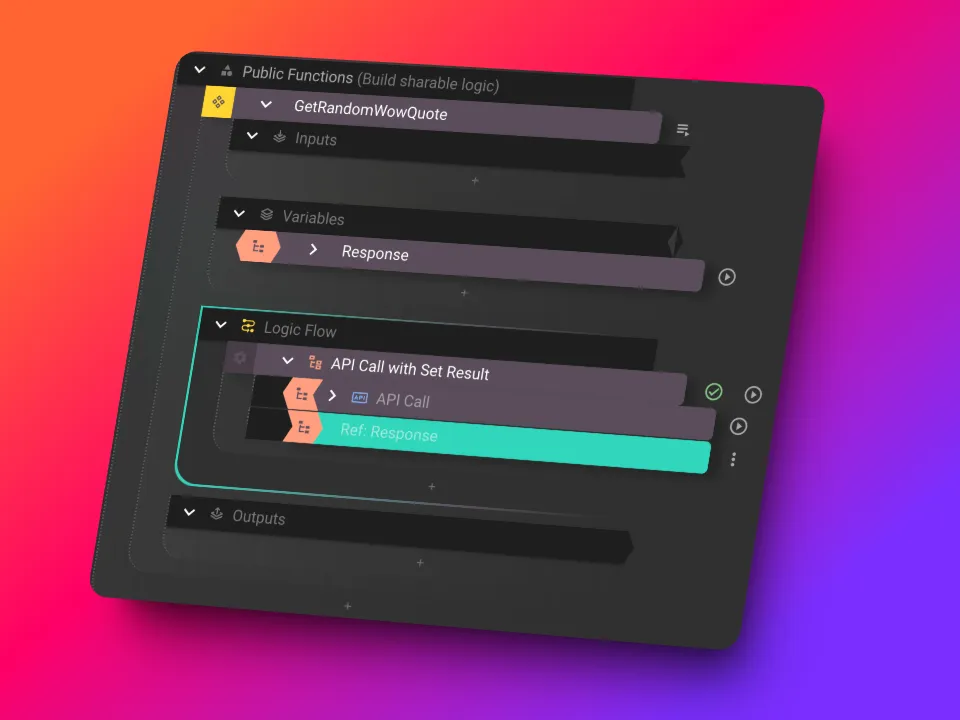
Now, let’s test the API call and see if what we have created works as expected!
- Choose the run option on the
Set Data Structureblock.
The results will be displayed in Comnoco’s block format within the properties for the Response variable.
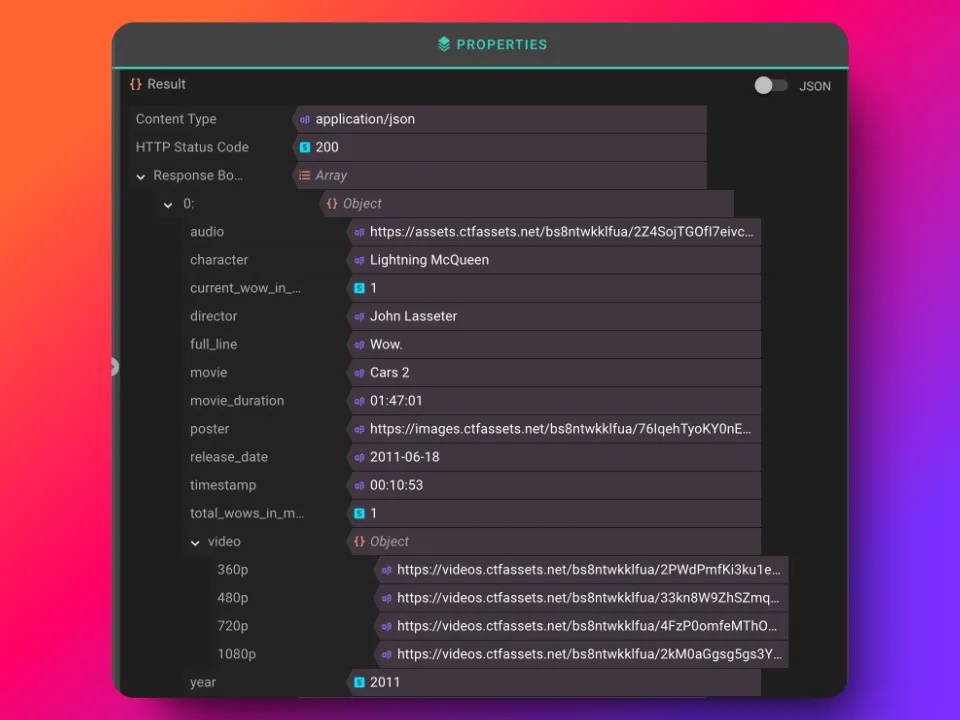
Congratulations! You have just successfully set up your first API call. 🎉
Handling API Authentication (if required)
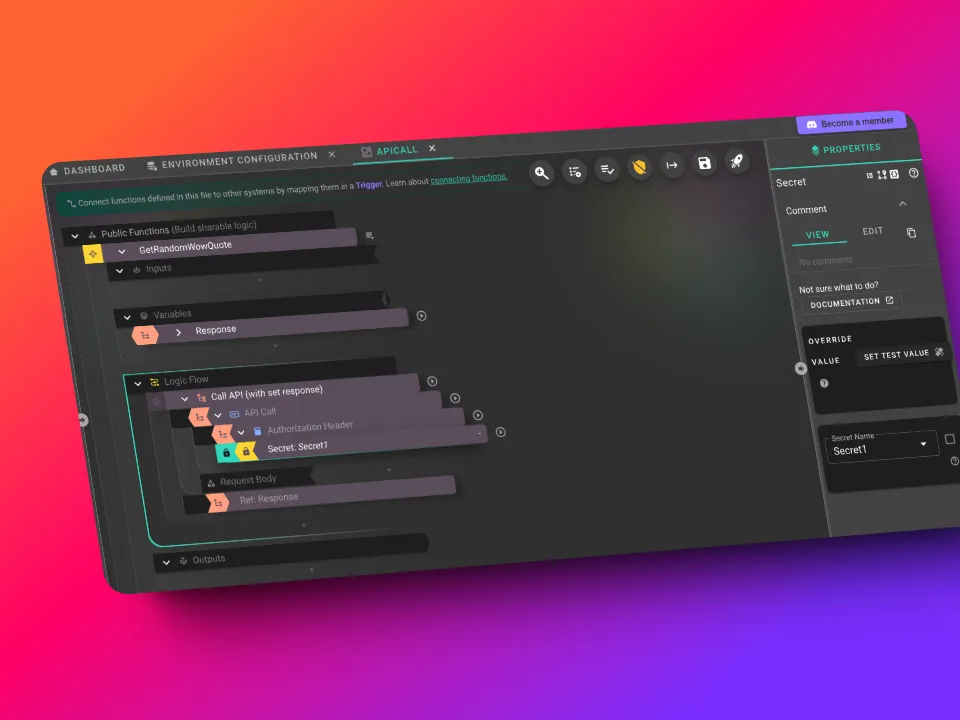
If the API you are calling (such as OpenAI) requires authentication, the following steps will show you how to configure an auth option (in this case - API Key in the headers).
1. Navigate to the Authentication Mechanism:
Under your API call block, you will see an Auth Mechanism slot. You can click on the + add point and select an option.
2. Set the Authentication Header:
Select Authentication Header as the method (from the list of blocks).
You will have the option to include a keyword, such as Bearer or Token, depending on the API’s requirements.
Once this is set, a new child slot Token will appear. This will enable you to select a Secret block. Here you can choose a secret that contains your API key.
3. Creating a Secret (if you don’t have one):
If you do not already have a secret configured, navigate to the Environment Configuration Page on the left hand side to create one. Secrets are stored securely, encrypted, and are only visible to you—no one else can access or view them.
Proceed to Section 2 for a deeper dive into working with the API data within Comnoco.
Section 2: Modifying the API Call
In Section 1, we manually executed an API call by entering the URL and selecting the appropriate HTTP method, which returned a random “Wow” quote.
Now, we will delve into customizing the API call to retrieve specific results by specifying parameters such as the number of results, movie name, and year.
Configuring an API call can be achieved in 2 ways:
- Using the cURL Method
- Manually Inputting Parameters
1. Using the cURL method to configure the API call.
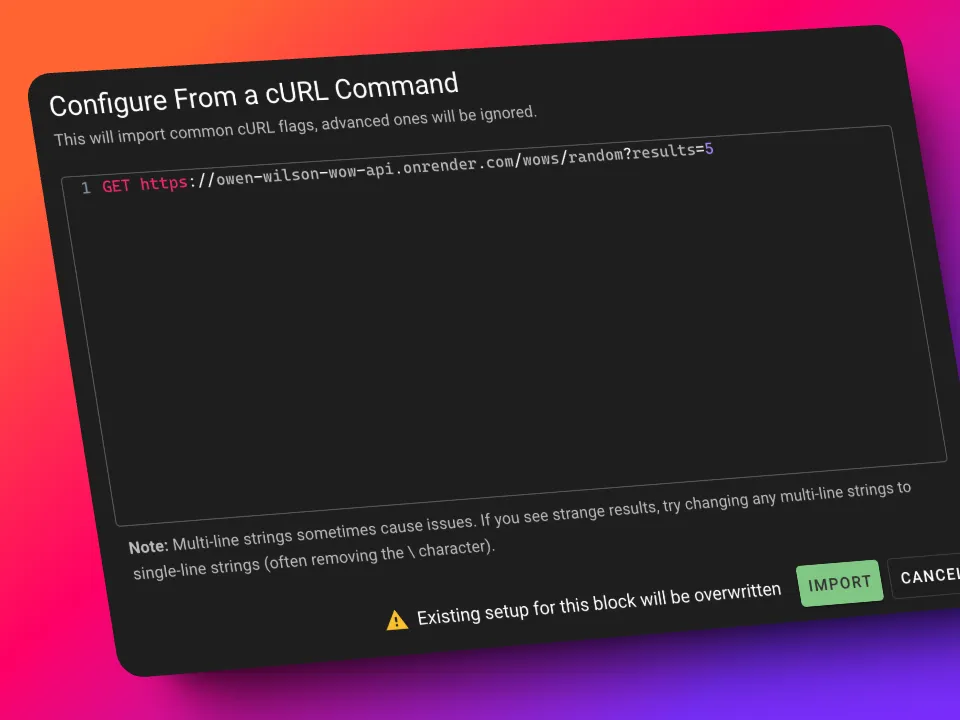
Obtain the cURL command: Obtain the cURL command from your API documentation (in this case ours is a very simple GET followed by a URL).
Importing the cURL command: Copy the cURL command and paste it into the Import from cURL section within the API Call block’s properties.
Comnoco will parse the cURL command, extracting and assigning the parameters to the request automatically.
2. Manually Inputting Parameters to configure the API call.
-
Navigate to the
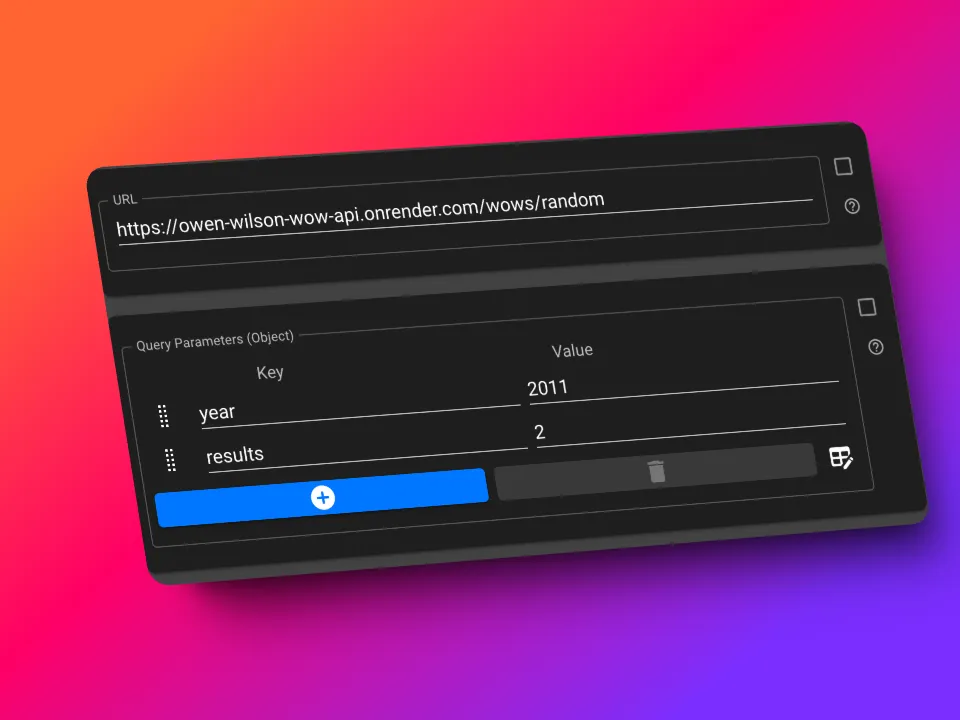
Query Parameterssection within the API Call block’s properties. -
Input Key-Value Pairs:
This section consists of two fields: Key and Value.
Parameters are set here by entering the appropriate key (name) and corresponding value.
Example Setting the Year Parameter:
Start by specifying the year.
The Key must match the format used in the API’s JSON results, as it is case-sensitive.
Set the Value to 2011. This will configure the API call to retrieve a “Wow” quote from a movie released in 2011.
Example Setting the Results Parameter:
To specify the number of results, use the key ‘results’.
For the Value, input the desired count, keeping in mind that counting starts from an index of 0. For example, entering 5 will return five quotes numbered up to 4 (0,1,2,3,4).
Section 3: Handling Multiple Records inAPI Responses with Loops
In this section, we will use the Comnoco version of a for loop to iterate through the array of results retrieved from the API call.
We’ll use this for the simple task of combining multiple “Wow” quotes into a single output.
3.1: Setting up the Loop
1. Create the End Variable
Navigate to the variables section.
Create a new Text String variable, which will store the combined outputs of the quotes.
We have named this variable CombinedQuotes.
2. Add the Loop Block
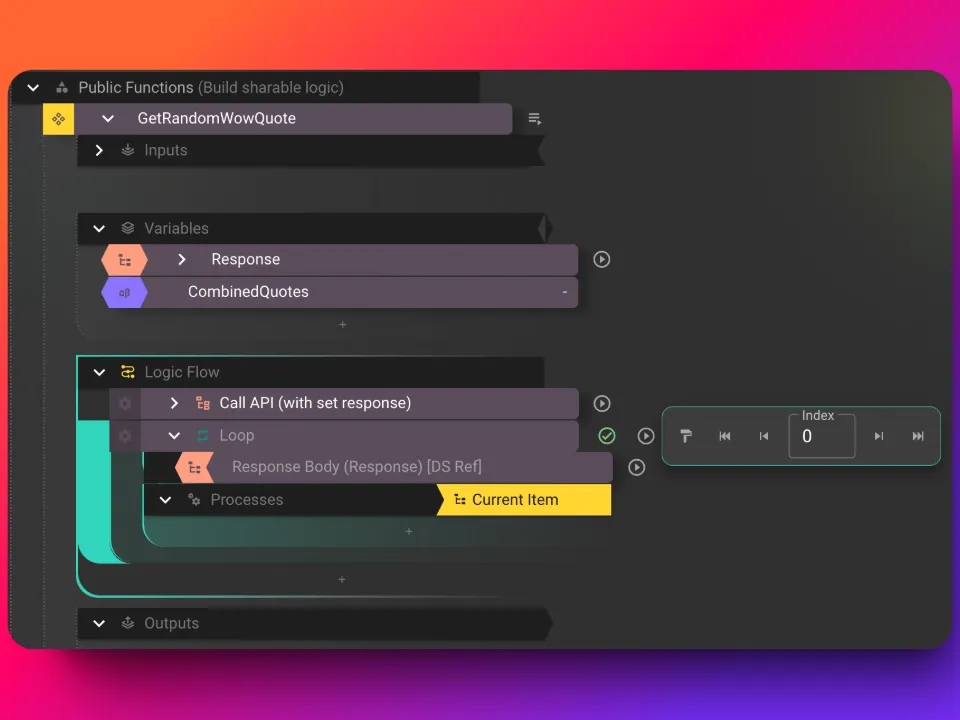
Go to your Logic Flow and add a Loop block directly below the existing API call.
3. Set the Data to Loop Through
In the Data slot, specify the array you want the loop to iterate through. This array will come from the Response variable we previously utilised, specifically the Response Body (Array).
To find this array, click on the + add point and locate the Internal Variables section, select the response variable of your API call and expand it, locate the response body array and assign it as the data for this loop.
4. Understanding Indexing
After creating the loop, click on the loop block once for the prime data index settings to appear.
This index represents the position of each item in the array as the loop processes it.
To load and view the first item in the array, click on the paintbrush symbol.
You can alternatively step through each record in the array or choose a specific one to work with.
You should notice that the results do not just include the ‘Wow’ quotes but also many other data fields. In the next section we will extract the ‘Wow’ quote from each record.
3.2: Extracting and Combining the Quotes
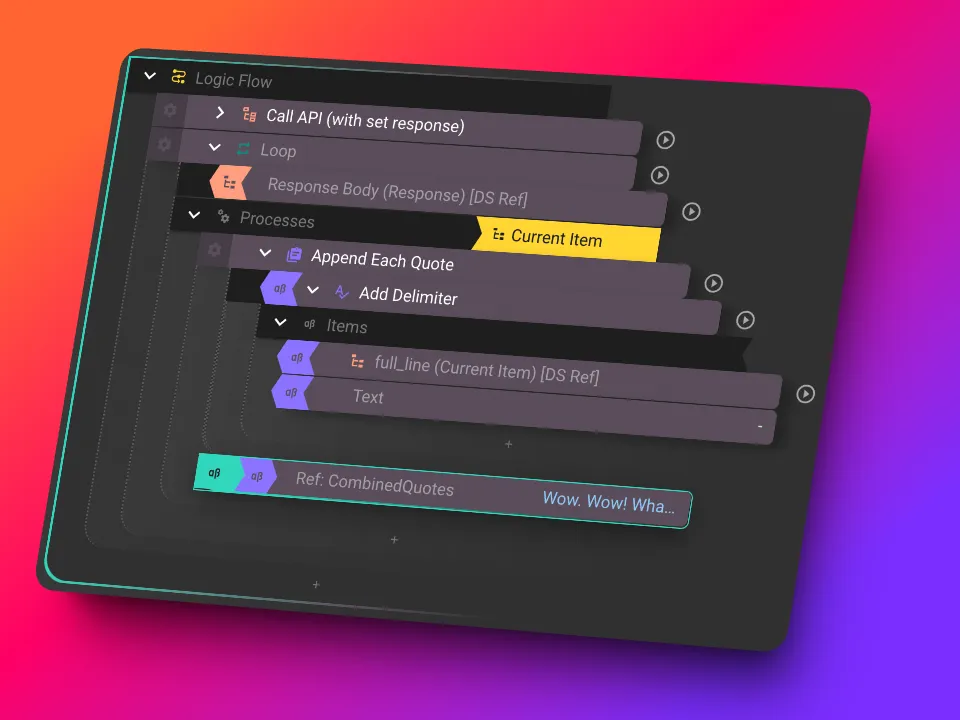
1. Add a Process to Extract Quotes
- Within the
Loopblock, locate theProcessesslot and add aSet Textblock.
Now let’s set this block’s properties:
- As we want it to append each quote to the existing combined quotes, we will set the
Appendproperty totrue. - Optionally: Give the block a name to help you identify it later (eg.
Append Each Quote).
2. Configure the Set Text Process
-
In the To slot, select the
CombinedQuotesvariable from theInternal Variables(This is the text string variable we created earlier to store the combined results). -
In the From slot, expand the
Valuevariable within the Current Item of your loop block inLocal Variables.
(Local Variables are specific to the block they belong to — such as the Loop block in this instance — and will be visible when you are in a slot underneath a block that returns its own set of variables).
Select thefull_linefield, as it contains the actual Wow quote text for an item in your loop.
If you now run the function, you will see the combined quotes in the CombinedQuotes variable.
BUT they will be combined with no spaces or new lines between them.
- To fix this, we need to replace the existing block in the
Fromslot with aJoin Textblock. This will join the text together with a separator.- In the list slot under the
Join Textblock, re-add thefull_linefield from the Current Item of your loop block inLocal Variables. - We can now add a separator between each quote by adding a
Textblock containing a new line in the list slot after thefull_linefield.
- In the list slot under the
3. Rerun the Process
After making these changes, re-run the entire function to see the results.
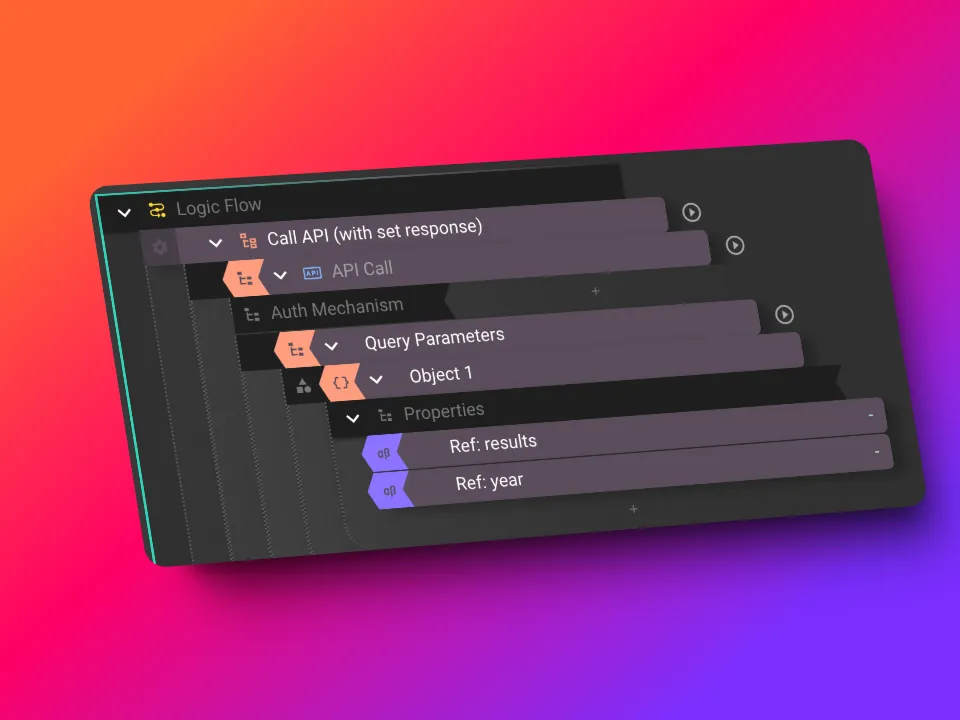
Your final Logic Flow should look like this:
Section 4: Turning the API Call Into a Secure REST Endpoint
To expose the combined quotes as a secure REST API, we need to wrap the existing Component Function in a new API Function, as component functions in Comnoco cannot be directly exposed as APIs (because they do not have the Request and Response details parameters).
Follow these steps to prepare and configure the Component Function and see how you can use component functions to create your own bespoke blocks:
4.1: Preparation Steps for your Initial Component Function
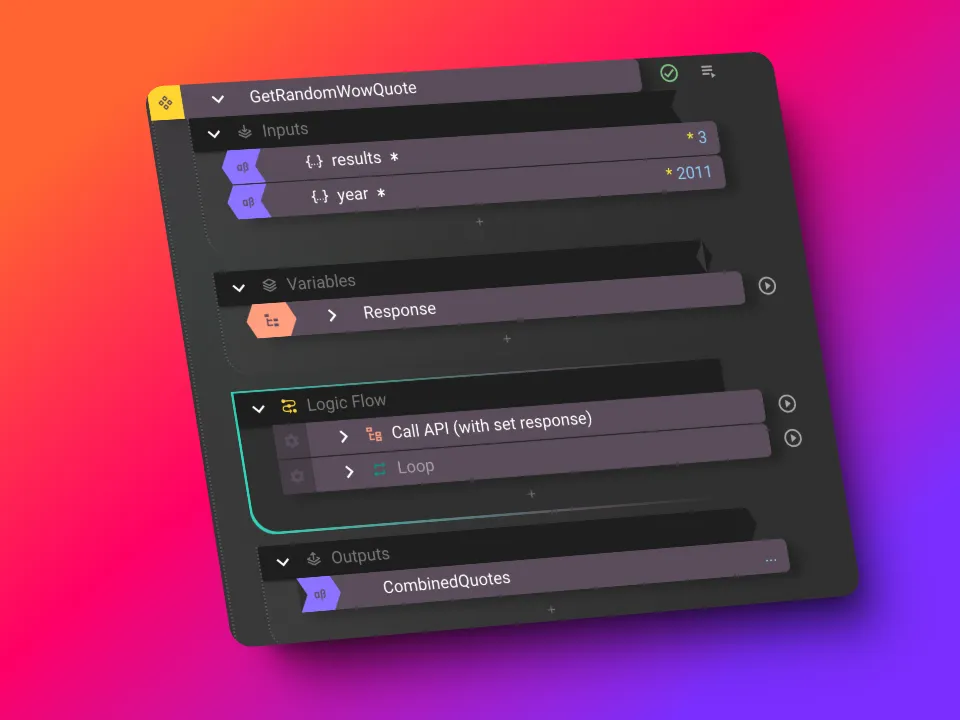
1. Set Output Parameters:
Navigate to the Outputs list slot of your component function.
Drag the CombinedQuotes variable from the Internal Variables section in the Outputs field. This step ensures that the combined and formatted quotes are properly returned by the function.
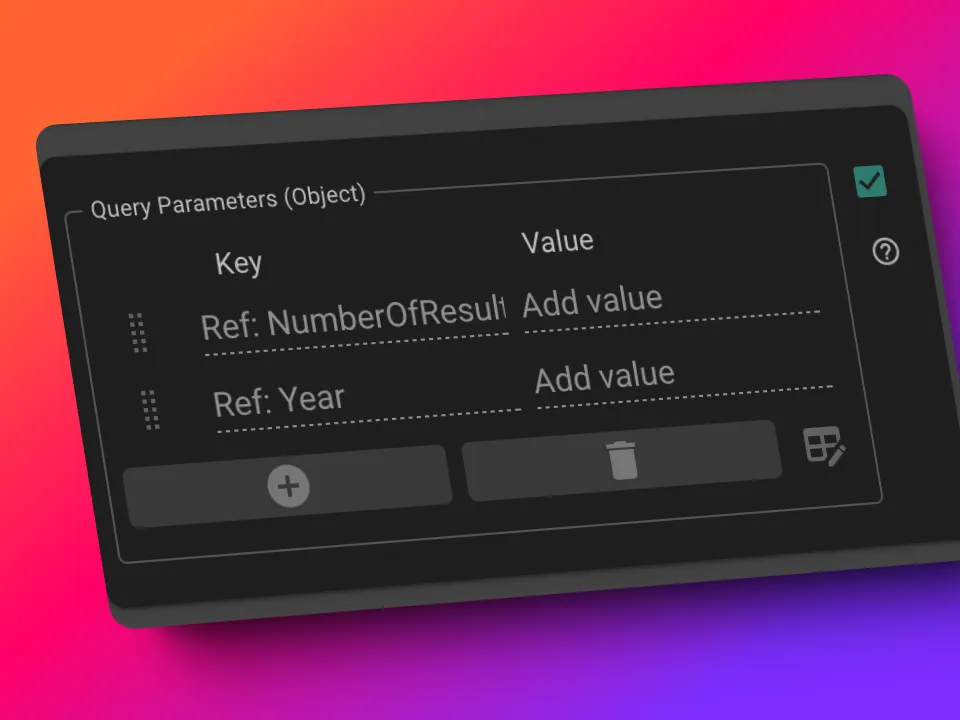
2. Expose Query Parameters:
Navigate to the API Call block within your original Component Function.
Locate the Query Parameters (Section) in the properties panel where we previously set results and year. Tick the checkbox beside these parameters to make them visible in the tree for dynamic configuration.
3. Add Input Parameters:
Go to the inputs list slot of your component function.
Create two new text string parameters:
results:To dynamically determine the number of quotes retrieved.year:To specifiy the year for filtering quotes.
4. Map Input Parameters in the Logic Flow:
Return to the logic flow of the component function.
Replace the Query Parameters (now visible in the tree) under your API Call block with linked input parameters (known as references) to the input parameters you just created.
By doing this you will be able to pass these in to your function from anywhere that calls it.
Go to the properties section of each of these input parameters, and under Test Values input sample values for the parameters. Run the component function to verify the changes work as expected.
4.2: Creating the API Function
Now that we have our component function ready, we can create an API function to expose it as a REST API.
- Add a new
API Functionbelow your existing Component Function.
1. Set the Output
- Once you have created your API function, create an output parameter and set its type to text, as it will store the Wow quotes returned.
- In the Logic Flow of your API function, create a Set Text block.
- In the To slot, select the output field you just created.
- In the From slot, you will be able to select the component function you created earlier. This is because it returns text and we are in a text slot.
2. Add Input Parameters
Now we need to add values to the input parameters for the component function we just added. We could just add basic values directly in the slots but we will want to pass these in as API parameters, so let’s do what we did above (in steps 4.1.3 and 4.1.4.) but now in this API function
3. Test Values and Cleanup
Now we can set some test values for the input parameters and run the API function, but before we do…
- Clear the Test Values from the Component Function’s input parameters (otherwise they will be used while testing instead of the values we set in the API function).
You can do this either manually or you can click the Trash Can icon at the top to remove all overrides.
4.3: Creating the API Endpoint
Now that we have the API function ready, the next step is to create an endpoint to trigger it. This will create an API endpoint that triggers your function.
You can do this from the same menu you used to create your function collection, from the pull out side bar on the left or from the button in the top right of the function collection.
We recommend you use the button as it is the quickest way and suggests a default name for the API trigger that matches your function collection.
1. Creating the Endpoint
Once you have created a trigger file, the trigger type will be set to API by default, leave this as it is what we want.
For this example, the GET method will be used. This is where the API function will be linked to the endpoint.
- Click on the
+add point next to theGETmethod and select theAPI Functionblock.
2. Security Settings
Next we need to choose what security to apply to this trigger (API).
There are a number of choices from using API keys, checking users are logged in using Supabase Auth or using a JWT token, checking IP addresses etc..
We are going to keep it really simple by allowing the endpoint to be publicly accessible, so:
- Click on the
+add point where it saysClick here to add Auth Middlewareand selectNo Auth(Public). - Select a bot/user to assign to this trigger.
- Select the
Active on publishtoggle to ensure the trigger is active when you publish.
3. Publish and Test Your API
We’re all set! Now we can publish and use/test our API.
You can publish by clicking the rocket icon in the top right of the trigger file. Make sure you select to save all your changes and publish.
Once published, select the View Created APIs, Scheduled Tasks, Logs and Throughput/Status option from the left hand side menu.
This will open a new tab where you can see the API Spec, Logs and Throughput/Status.
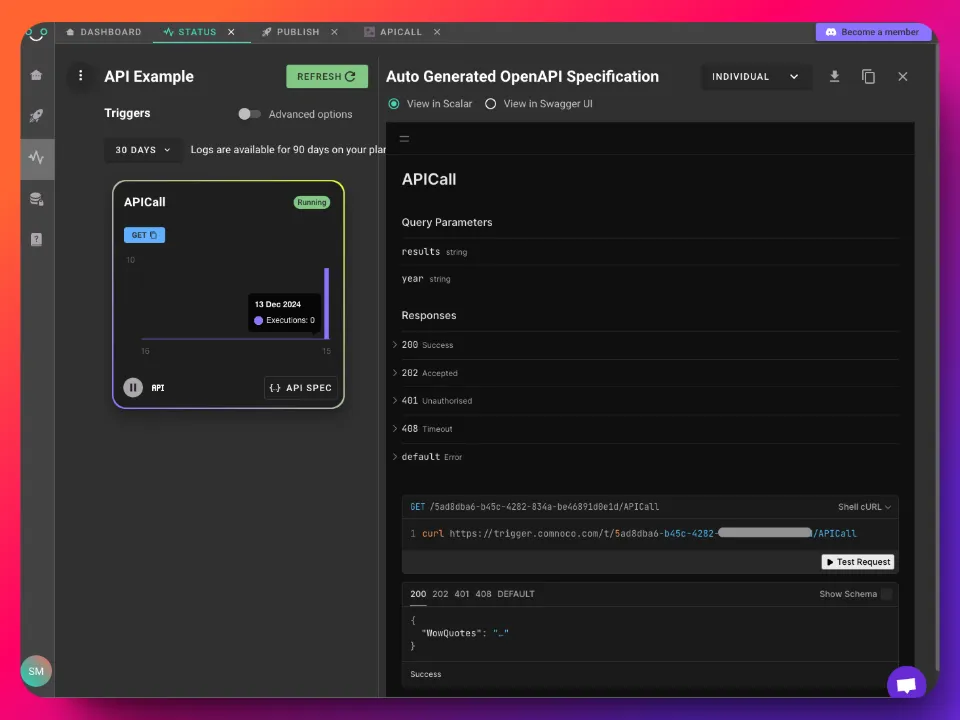
Go ahead and test it out to confirm its working as intended (make sure you fill in the input parameters with values when you test it).
4. Adding Security to Your API
Now let’s show you how to secure your API so it is no longer available publicly.
- In the *trigger security settings, swap the
No Auth(Public)option forAPI Keyas the security method. - Generate an API Key for the bot/user that has access to your workspace.
Once the API Key is generated, note it immediately. It will not be visible again. If lost, you can regenerate a new key, but the original key will not be retrievable. - In the
API Keyblock properties, select the newly created API key - this will secure the endpoint allowing access only if a header calledAPI-KEYis sent with your API request (these are default values that you can change if you want).
After securing the endpoint with the API key, republish it to apply the changes.
Make sure the toggle for ‘Active on publish’ is switched on before publishing!
Now you can test it with and without your API key to see the security in action.